📋 Requirements: Confluence admin access + Microsoft Dataverse credentials
- Tenant ID + Client ID + Client Secret are app-level credentials. Treat the Client Secret like a password.
- What PP2Wiki can access is controlled by Entra API permissions + admin consent. Grant only what is required (least privilege).
- PP2Wiki uses app-based access (service principal). Dataverse permissions are applied to the Dataverse application user of this app (not to individual Confluence users).
- Dataverse access requires a Security Role. Create the app as a Dataverse application user and assign a suitable Security Role, otherwise requests will fail.
- If you are not familiar with Entra/App Registrations and Dataverse security: let an Entra/Identity admin perform this setup.
- Secret rotation: secrets can expire. Create a new secret → update PP2Wiki → test connection → save → delete the old secret.
- Emergency stop: if you suspect misuse, revoke consent/remove permissions in Entra and/or rotate the secret immediately.
Before You Start
To connect PP2Wiki to Dataverse, you'll create one or more environment entries. Each entry needs 4 credentials plus a display name. If you don't have them yet, ask your Microsoft administrator or see the "Where to Find Your Credentials" section below.
| Credential | Description | Example |
|---|---|---|
| Name | User-friendly label for this environment | Production, Sandbox, DEV Generic |
| Tenant ID | Your organization's Microsoft directory ID | 12a34b56-789c-0def-1234-567890abcdef |
| Client ID | Application ID from your Microsoft app registration | 9abc8def-7654-3210-9abc-def0123456789 |
| Client Secret | Secret key for authentication (keep this safe!) | abc~1234567890_-ABC1DEF2GHI3jkl4 |
| Dataverse URL | Your Dataverse environment URL | https://myorg.crm.dynamics.com |
Step 0: Configure API Permissions in Azure
Before you can use PP2Wiki, your Microsoft admin needs to set up API permissions in Azure. This gives PP2Wiki permission to access your Dataverse environment.
Required API Permissions:
| API | Permission | Type | Purpose |
|---|---|---|---|
| Dynamics CRM | user_impersonation |
Delegated | Access to your Dataverse data |
| Microsoft Graph | User.Read |
Delegated | Read user profile information |
How to Add API Permissions in Azure
- Go to the Azure Portal
- Navigate to Microsoft Entra ID
- Select App registrations
- Click on your app (the one you'll use for PP2Wiki)
- In the left menu, click API permissions
- Click Add a permission
- Search for Dynamics CRM and select it
- Click Delegated permissions
- Check
user_impersonationand click Add permissions - Click Add a permission again
- Search for Microsoft Graph and select it
- Click Delegated permissions
- Search for and check
User.Read - Click Add permissions
- Back on the API permissions page, click Grant admin consent for [Your Organization]
- Confirm the prompt
What's next? After permissions are configured, you must create the Dataverse application user (Step 0b), then continue with the PP2Wiki setup below.
Step 0b: Create the Dataverse Application User (Required)
PP2Wiki accesses Dataverse as an app (service principal). Therefore, you must add this app as a Dataverse application user and assign a Security Role.
- Open the Power Apps portal and select your environment
- Go to Settings → Users + permissions → Application users
- Click New app user
- Select the Entra app registration you created for PP2Wiki
- Assign at least one Security Role that grants the required table access (read permissions)
- Save the application user
Setup Steps
Open App Configuration
- In Confluence, click the Settings icon (⚙️) at the top right
- Select Apps
- Find PP2Wiki in the app list
- Click Configure
Screenshot: Confluence Settings menu with PP2Wiki app configuration option
Add an Environment
Click Add Environment and fill in all required fields (Name, URL, Tenant ID, Client ID, Client Secret):
| PP2Wiki Field | Azure Location | Azure Field Name |
|---|---|---|
| Name | Choose a user-friendly environment label | Free text (e.g. Production, Sandbox) |
| Tenant ID | App Registration → Overview | Directory (tenant) ID |
| Client ID | App Registration → Overview | Application (client) ID |
| Client Secret | App Registration → Certificates & secrets → Client secrets | Value (NOT Secret ID) |
| Dataverse URL | Power Apps/Automate environment | Browser URL domain |
https:// and with or without trailing / are matched consistently.

Placeholder (Step 2): Add Environment form with Name, URL, Tenant ID, Client ID, and Client Secret
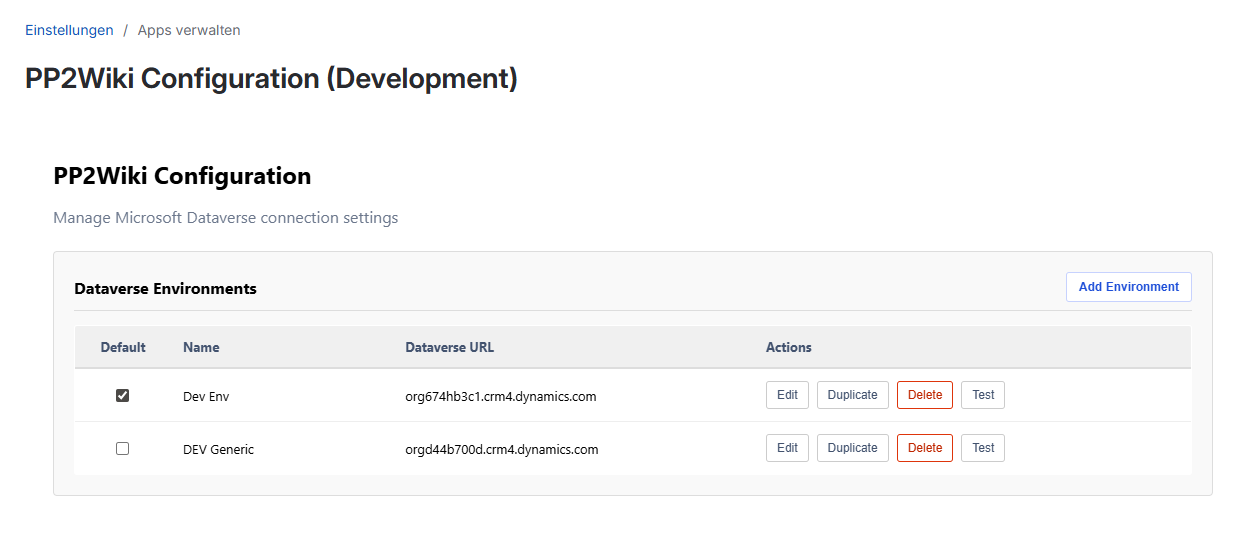
Set Default and Test
Set one environment as the default (checkbox in the first column), then click Test on that environment row. This verifies that credentials and Dataverse access are correct.
- ✅ If successful: You'll see a green message saying "Connection successful"
- ❌ If it fails: Check your credentials and try again (see Troubleshooting below)

Placeholder (Step 3): Environment list with default selection and Test action
Save and Repeat (Optional)
Click Save Configuration for the current environment. Repeat this step to add more environments (for example: Production and Sandbox).

Placeholder (Step 4): Successful save state after adding one or more environments
Where to Find Your Credentials
🔑 Tenant ID
- Go to Azure Portal
- Search for and open Microsoft Entra ID (formerly Azure AD)
- In the left menu, select Overview
- Copy the Tenant ID (the long GUID near the top)
🆔 Client ID & Client Secret
- In the Azure Portal, go to Microsoft Entra ID
- Select App registrations from the left menu
- Find and click your app (or create one if you don't have it)
- Copy the Application (Client) ID
- Go to Certificates & secrets in the left menu
- Under Client secrets, click New client secret
- Copy the secret value immediately (you won't be able to see it again)
🌐 Dataverse URL
- Go to your Power Apps or Power Automate portal
- In the top right, select your environment
- The URL in your browser is your Dataverse URL (e.g.,
https://myorg.crm.dynamics.com)
Troubleshooting
❌ "Connection Failed" Error
Possible reasons:
- Missing Dataverse role – The Dataverse application user exists but has no Security Role (or insufficient privileges)
- Wrong credentials – Double-check each value, character by character
- Invalid Dataverse URL – Make sure it includes "https://" and ends with ".com"
- Credentials expired – Your Client Secret may have expired (create a new one in Azure)
- Network issue – If credentials are correct, try again in a few moments
❌ I don't see a "Configure" button
Solution: Make sure you're logged in as a Confluence admin. Only admins can configure PP2Wiki.
❌ I can't find my Dataverse URL
Solution: Open Power Apps or Power Automate, and look at the URL in your browser. It should look like: https://orgname.crm.dynamics.com
❌ Macro error: Optional Dataverse URL not configured
Reason: A page macro references an environment URL that does not exist in PP2Wiki admin settings.
Solution: Add that URL as an environment in PP2Wiki Configure, or clear the macro field Dataverse Environment (Optional) to use the default.
❌ I cannot edit Dataverse URL in an existing environment
Reason: This is expected. The URL is used as the technical identifier of the environment entry.
Solution: Use Duplicate, set the new URL in the duplicated entry, save, switch default if needed, then delete the old environment.
❌ Still stuck?
Ask your Microsoft administrator to verify that your app registration has the correct permissions set up in Azure.
What Happens Next?
Once you've completed the setup, users in your Confluence workspace can start using PP2Wiki. They'll be able to:
- Add the PP2Wiki macro to any page
- Display Dataverse tables (like accounts, contacts, projects, etc.)
- Search and sort the data right in Confluence
For details on how users add and configure the macro, see the User Guide.